DIY
Pumpkin Planter
make your own jack-o-plantern
DIY Pumpkin Planter
Create your own jack-o-plantern by cutting open a pumpkin and planting your favorite fall flowers and foliage inside!
Step 1
Cut top off of the pumpkin & scoop out insides.
Step 2
Coat interior with vaseline. This helps it stay fresh longer.
Step 3
Add a handful of charcoal to the bottom. This will soak up excess water, helping your pumpkin planter last longer.
Step 4
Fill pumpkin about halfway with Pike Potting & Container Soil.
Step 5
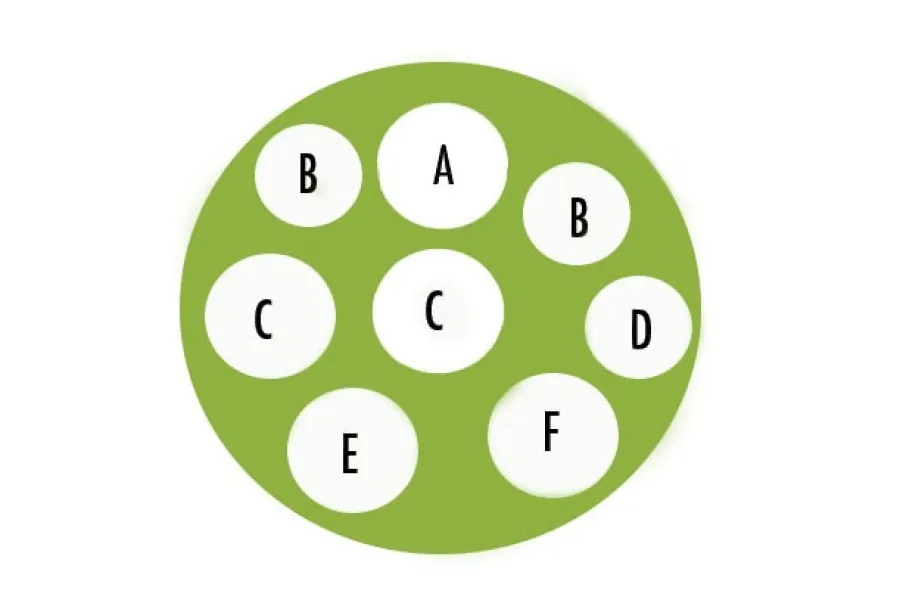
Arrange plants according to diagram, then add more soil to
fill in gaps between plants. The plants in this jack-o-plantern prefer full sun. If you have a shady yard, you can choose shade-loving plants like impatiens, cyclamen and more.
Recipe
B - Pansies
C -
Green Kale
D -
Variegated Vinca
E - Variegated Box Honeysuckle
F -
Ornamental Pepper

Care Instructions
- Once planted, your jack-o-plantern will only last about 10-14 days before turning to mush. At that time, you can discard the pumpkin and transplant the flowers to another container or a garden bed.
- Be judicious while watering! Excess moisture will speed up the pumpkin's rotting process. Use the "touch test" by sticking your finger about 2 inches into the soil to determine if the planter needs water. Since the pumpkin does not have a drainage hole, be careful not to give too much water at one time.
- Place in a location that gets full to partial sun. Less sun will help the pumpkin last longer. If you choose to use shade-loving plants, place your jack-o-plantern in a suitably shady location.
Shopping List
- 1 - Medium to Large Pumpkin (classic orange or heirloom)
- 1 - Carex Grass
- 1 - Ornamental Pepper
- 1 - Purple Kale
- 1 - Green Kale
- 2 - Pansies
- 1 - Variegated Vinca
- 1 - Variegated Box Honeysuckle
- 1 - Bag Pike Potting & Container Soil, 8 qt.
- Petroleum Jelly
- Horticultural Charcoal
Other Jack-o-Planterns for Inspiration


